

Steel Mace 360: Complete Progression Guide from Beginner to Advanced
Master the steel mace 360 with this step-by-step progression guide covering grip, mechanics, common mistakes, and programming for all levels.
The 360 is the movement that hooks people on steel mace training. There's something deeply satisfying about swinging a weighted lever behind your head and catching it cleanly on the other side. It looks fluid when done well. It looks like a trip to the ER when done poorly.
This guide breaks the movement down into progressions that actually work, so you can build the 360 from the ground up without smacking yourself in the spine along the way.
Why the 360 Matters
The steel mace 360 is a full-body rotational exercise that demands grip strength, shoulder mobility, thoracic rotation, and core stability all at once. A 2019 analysis published in the Journal of Functional Morphology and Kinesiology found that rotational exercises with offset loads create unique demands on the stabilizing muscles of the trunk and shoulder girdle. The mace 360 is a textbook example.
Because the weight sits at the end of a long lever arm, even a 10-pound mace creates significant rotational force. That's what makes this movement so effective for building resilient shoulders, and it's also what makes technique non-negotiable.
The Grip: Where Everything Starts
Before you swing anything, you need to understand the hand mechanics. The 360 uses what's commonly called a "hand-over-hand" or "kayak" grip transition.
Here's how it works:
- Starting position: Hold the mace vertically in front of you, with the mace head pointing straight up. Your dominant hand is on top, your non-dominant hand is a few inches below it.
- Top hand: This is your power hand. It initiates the pull and does most of the work.
- Bottom hand: This is your guide hand. It loosens its grip during the swing to allow the mace to rotate through, then re-grips on the catch.
The most common beginner mistake is gripping too hard with both hands. If you squeeze the handle equally throughout the entire movement, the mace can't rotate. Your bottom hand has to let the handle slide through it during the swing phase. Think of it less like holding a barbell and more like guiding a rope.
Progression 1: The Pendulum
Don't start with the full 360. Start here.
Hold the mace at the bottom of the handle with the mace head pointing up. Let the mace tip backward behind your head about 6 inches, then pull it back to vertical. That's it. Small, controlled tilts.
You're training your shoulders and grip to manage the offset load. You're also getting comfortable with the mace being behind your head, which is psychologically harder than it sounds.
Do sets of 10 to 15 reps per side. When this feels easy, you're ready to move on.
Progression 2: The Gravedigger (Partial 360)
The gravedigger takes the mace from one side of your body, behind your head, and stops at the other side. It's half a 360.
From the starting position, pull the mace head back and to one side, letting it arc behind your head. Your elbows will bend and point upward. Stop when the mace head reaches the opposite side, then reverse it back.
Key cues:
- Keep your elbows relatively close to your head. Flared elbows mean the mace is controlling you, not the other way around.
- Your core stays tight. If your lower back is arching hard, the mace is too heavy or your thoracic mobility needs work.
- Move slowly. This isn't about speed yet.
Spend at least a week here. Two weeks is better.
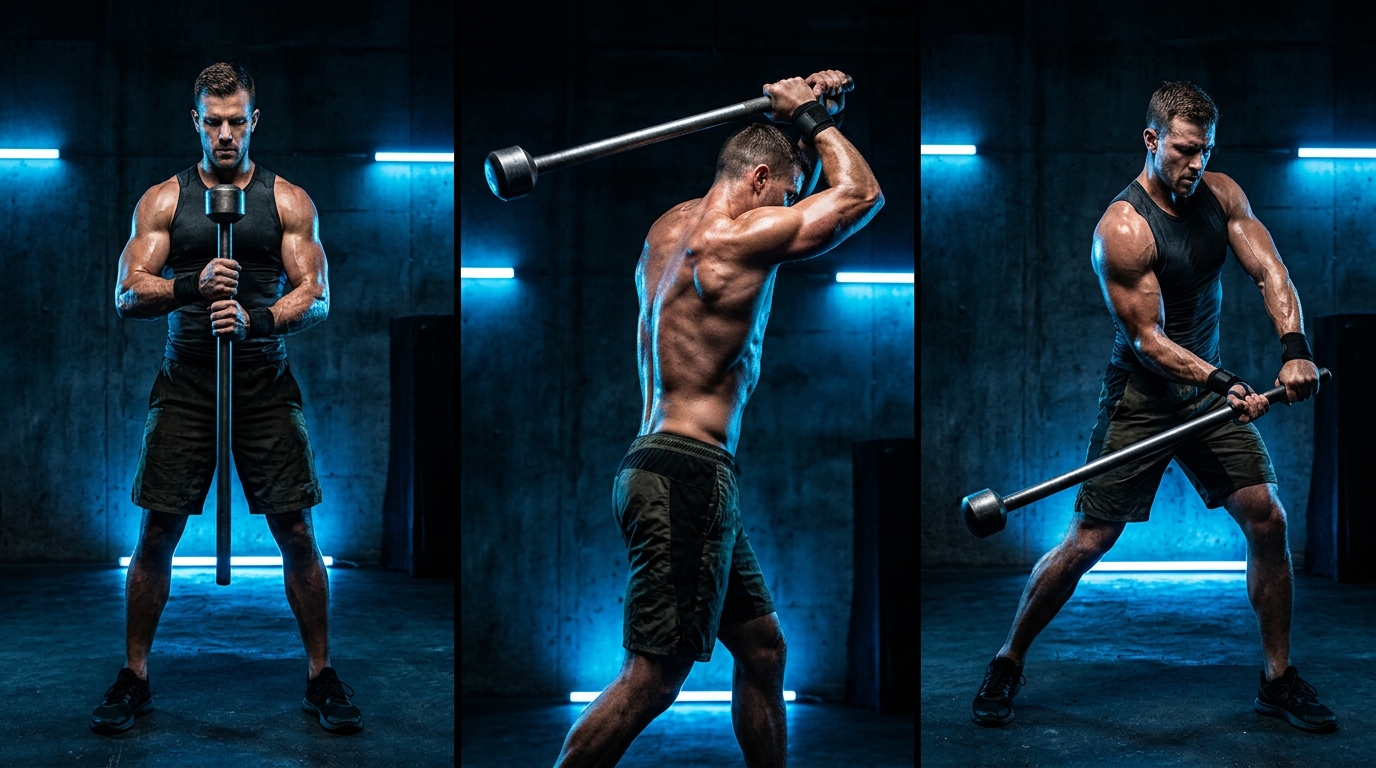
Progression 3: The Full 360
You've built the foundation. Here's the full movement.
Step by step:
- Start with the mace vertical, head up, in front of your body.
- Pull the mace head back and to your right (if swinging right-handed) by bending your elbows.
- As the mace head drops behind your back, your top hand pulls it across while your bottom hand loosens to let the handle rotate.
- The mace head swings behind you in an arc, traveling from your right side to your left side.
- As the mace comes around to the front, your bottom hand re-grips and both hands guide the mace back to the starting vertical position.
The whole thing should feel like one smooth circle, not a series of choppy steps. The mace head traces a halo-like path behind your body.
Critical safety point: The mace head should travel close to your body throughout the arc. If it drifts far away from your back during the swing, it creates a huge moment arm that your shoulders and lower back have to absorb. Keep it tight.
Common Mistakes and Fixes
| Mistake | What It Looks Like | Fix |
|---|---|---|
| Death grip with both hands | Mace stutters and won't rotate smoothly | Practice letting the bottom hand loosen during the swing phase |
| Excessive lumbar extension | Lower back arches hard as the mace passes behind | Brace your core like you're about to get punched. Use a lighter mace |
| Wide elbow flare | Elbows point out to the sides instead of up | Think "elbows to the ceiling" during the behind-the-head portion |
| Mace drifts away from body | The mace head swings far behind you | Shorten the arc. Pull the mace closer to your upper back |
| All arms, no core | Upper body twists excessively | Plant your feet, squeeze your glutes, and keep your hips facing forward |
Programming the 360
Once your technique is solid, you need to actually program this movement intelligently.
For technique development, keep reps low. Sets of 5 per side with full focus on form. Rest 30 to 45 seconds between sets. A timed interval approach works really well here. If you're using FlowTimer, you can set up custom work/rest intervals to keep your practice structured without having to count in your head while swinging a weighted object near your skull.
For conditioning, longer sets of 10 to 20 reps per side with shorter rest intervals will get your heart rate up fast. The 360 becomes a completely different animal at higher rep ranges.
For shoulder health and warm-ups, a light mace (7 to 10 pounds) for sets of 8 to 10 per side is an excellent way to open up your shoulders before pressing or overhead work. Your rest interval strategy matters here too. Shorter rest keeps blood flowing to the working tissues; longer rest lets you maintain perfect form.
Here's a simple progression framework:
| Week | Focus | Sets x Reps per Side | Mace Weight |
|---|---|---|---|
| 1-2 | Pendulum + Gravedigger | 3 x 10-15 | 7-10 lb |
| 3-4 | Full 360 (slow tempo) | 5 x 5 | 7-10 lb |
| 5-6 | Full 360 (normal tempo) | 4 x 8 | 10-15 lb |
| 7-8 | Full 360 (conditioning) | 3 x 15-20 | 10-15 lb |
A Note on Mace Weight Selection
People consistently go too heavy too soon with the 360. A 10-pound mace feels light when you hold it. It doesn't feel light when it's arcing behind your head at the end of a 42-inch lever.
Men: start with 10 pounds. Women: start with 7 pounds. I don't care how strong you are. The 360 is a skill movement first and a strength movement second. A 2021 study in Sports Biomechanics found that lever-based implements amplify perceived loading by 4 to 6 times compared to the same weight held at the center of mass. Respect the lever.

Building From Here
Once the 360 feels natural, you have a foundation for more advanced mace work. The 10-to-2 swing, the mill, the barbarian squat. They all build on the shoulder control, grip transitions, and rotational awareness you develop with the 360.
But don't rush past this movement. Some of the most experienced mace athletes I know still include 360s in every session. It's that foundational. Treat it like a kettlebell practitioner treats the swing. It's not just a beginner exercise. It's the exercise.
Ready to put this into practice? FlowTimer lets you build custom interval workouts, set precise work-to-rest ratios, and train with audio cues so you can focus on your form.
Try FlowTimer Free